xv6内存管理与进程调度过程浅析

前言

  xv6是x86处理器上用ANSI标准C重新实现的Unix第六版(Unix V6,通常直接被称为V6),本文主要对其虚拟内存管理以及进程调度的部分进行分析,从源码入手去总结一下其中要点。这部分内容其实一年前就看过了,一直没时间动笔写下来,在看过了CSAPP的相关内容后,又有了新的认识,也勾起了一年前已有点模糊的记忆,还是得记录下来。本文将按内核执行的时间顺序,梳理一遍在启动内核的过程中涉及进程调度和内存管理的部分,并由此扩展开来,进行简要分析。

万物之源——内存资源池

  看本文前需要一点虚拟内存的知识,可以参考之前写的文章linux系统内存管理。最好也把xv6内核引导部分了解一下,参考之前写的文章xv6-bootstrap部分源代码分析

  内核负责动态分配空闲的物理内存给进程的内存页表、用户的堆栈、内核栈以及管道buffer这些在运行时消耗内存的结构。因此内核必须维护一个内存的资源池,统一管理所有空闲的内存,就像用户态的malloc内存分配器一样,只不过前者更底层一点,负责内核态的内存管理,后者负责用户进程的内存管理。

  我们主要看一下这个资源池是怎么初始化,以及怎么分配和释放空闲内存的。内核是用虚拟内存地址来管理内存池的,这就有一个鸡生蛋和蛋生鸡的问题:资源池的初始化需要先有虚拟内存页表,但虚拟内存页表的分配则需要依赖资源池的存在。xv6的解决办法是在创建资源池前,先以一个简陋的内存页表作为过渡,在该内存页表的控制下,创建资源池,重新分配一个复杂的内存页表。

1
2
3
4
5
6
7
__attribute__((__aligned__(PGSIZE)))
pde_t entrypgdir[NPDENTRIES] = {
// Map VA's [0, 4MB) to PA's [0, 4MB)
[0] = (0) | PTE_P | PTE_W | PTE_PS,
// Map VA's [KERNBASE, KERNBASE+4MB) to PA's [0, 4MB)
[KERNBASE>>PDXSHIFT] = (0) | PTE_P | PTE_W | PTE_PS,
};

  上面的代码就是在内核里定义的在内存资源池创建前的过渡性的内存页表。把虚拟内存的0~4MB以及KERNBASE~ KERNBASE+4MB映射到物理内存的0~4MB。KERNBASE是高地址区,在xv6里是0x80000000。linux的传统是把高地址区域分配给内核的代码和数据。至于0~4MB的虚拟内存低地址映射,是为了处理开启CPU的页表寻址功能前后CPU都能正常执行指令。这是因为于在开启虚拟内存寻址前,CPU是用物理地址寻址的,此时当前执行的指令在低地址区域,而开启虚拟内存寻址后,必须要把虚拟地址映射到相同的物理地址,代码才能正常工作,实现无缝衔接。好了,有了这个过渡的页表,我们可以最多使用4MB的内存,暂时足够了。下面我们看看内核代码的main函数:

1
2
3
4
5
6
7
8
9
10
11
12
13
14
15
16
17
18
19
20
21
22
23
24
25
int
main(void)
{
kinit1(end, P2V(4*1024*1024)); // phys page allocator
kvmalloc(); // kernel page table
mpinit(); // detect other processors
lapicinit(); // interrupt controller
seginit(); // segment descriptors
cprintf("\ncpu%d: starting xv6\n\n", cpunum());
picinit(); // another interrupt controller
ioapicinit(); // another interrupt controller
consoleinit(); // console hardware
uartinit(); // serial port
pinit(); // process table
tvinit(); // trap vectors
binit(); // buffer cache
fileinit(); // file table
ideinit(); // disk
if(!ismp)
timerinit(); // uniprocessor timer
startothers(); // start other processors
kinit2(P2V(4*1024*1024), P2V(PHYSTOP)); // must come after startothers()
userinit(); // first user process
mpmain(); // finish this processor's setup
}

  kinit1和kinit2函数就是内存资源池的初始化函数了。

1
2
3
4
5
6
7
8
9
10
11
12
13
14
15
16
17
18
19
20
21
22
23
24
25
26
27
28
29
30
31
32
33
34
35
36
37
38
39
40
41
42
43
44
45
46
47
48
49
50
51
52
53
54
55
56
57
58
59
60
61
62
63
64
65
66
67
68
69
70
71
72
73
74
75
76
77
78
79
80
81
82
83
extern char end[]; // first address after kernel loaded from ELF file
struct run {
struct run *next;
};
struct {
struct spinlock lock;
int use_lock;
struct run *freelist;
} kmem;
// Initialization happens in two phases.
// 1. main() calls kinit1() while still using entrypgdir to place just
// the pages mapped by entrypgdir on free list.
// 2. main() calls kinit2() with the rest of the physical pages
// after installing a full page table that maps them on all cores.
void
kinit1(void *vstart, void *vend)
{
initlock(&kmem.lock, "kmem");
kmem.use_lock = 0;
freerange(vstart, vend);
}
void
kinit2(void *vstart, void *vend)
{
freerange(vstart, vend);
kmem.use_lock = 1;
}
void
freerange(void *vstart, void *vend)
{
char *p;
p = (char*)PGROUNDUP((uint)vstart);
for(; p + PGSIZE <= (char*)vend; p += PGSIZE)
kfree(p);
}
//PAGEBREAK: 21
// Free the page of physical memory pointed at by v,
// which normally should have been returned by a
// call to kalloc(). (The exception is when
// initializing the allocator; see kinit above.)
void
kfree(char *v)
{
struct run *r;
if((uint)v % PGSIZE || v < end || V2P(v) >= PHYSTOP)
panic("kfree");
// Fill with junk to catch dangling refs.
memset(v, 1, PGSIZE);
if(kmem.use_lock)
acquire(&kmem.lock);
r = (struct run*)v;
r->next = kmem.freelist;
kmem.freelist = r;
if(kmem.use_lock)
release(&kmem.lock);
}
// Allocate one 4096-byte page of physical memory.
// Returns a pointer that the kernel can use.
// Returns 0 if the memory cannot be allocated.
char*
kalloc(void)
{
struct run *r;
if(kmem.use_lock)
acquire(&kmem.lock);
r = kmem.freelist;
if(r)
kmem.freelist = r->next;
if(kmem.use_lock)
release(&kmem.lock);
return (char*)r;
}

  kinit1(end, P2V(4*1024*1024))的意思是把虚拟地址end开始,到物理地址4MB所对应的虚拟地址这段区域,分配给内存池。end就是内核代码段和数据段后面的空闲区域的第一个字节位置。因为内核使用虚拟地址管理内存池的,所以要把4MB转化成虚拟地址。kinit1主要是通过freerange函数初始化内存池。初始化其实直接用了释放内存的函数,freerange函数把某段虚拟内存地址段释放回内存池。freearange函数把要释放的内存段分成4k内存页为单位,调用kfree函数释放。

  内存池在xv6里是用链表简单实现的,就是上面代码里的run结构体组成的kmem.freelist链表,每一个run结构体直接存储在4k空闲内存块的头部,释放内存就相当于把4k的内存块的头部写上run结构信息,然后放到链表首部。这种把元信息记录在空闲数据内部的思想,非常精巧,不占用任何已分配的内存。

  与此相反,分配内存的kalloc函数就是从kmem.freelist链表头部取出一个run结点,把首地址返回。

  这里内存池的初始化实际上有两次。第一次只是把过渡页表分配的0~4MB里除去内核、BIOS等占用的内存,剩下的内存作为资源,kinit1只适用于单个CPU,没有加锁。在重新分配内存页表后,便有了更多的可用内存,不仅仅是4MB了,这时候可以用kinit2进一步初始化。kinit2是在多个CPU使能起来后,把所有内存都放到内存池里,此时内存的分配和释放就要加锁了。

  kalloc和kfree函数就是内核里的动态分配内存的工具。

内核内存页表

  内存资源池初始化完毕后,end到4MB的空间足以分配一个真正的内存页表了,是时候抛弃过渡的内存页表。内核在main函数里调用kvmalloc函数进行内核内存页表的分配。

1
2
3
4
5
6
7
8
9
10
11
12
13
14
15
16
17
18
19
20
21
22
23
24
25
26
27
28
29
30
31
32
33
34
35
36
37
38
39
40
41
42
43
44
45
46
47
48
49
// This table defines the kernel's mappings, which are present in
// every process's page table.
static struct kmap {
void *virt;
uint phys_start;
uint phys_end;
int perm;
} kmap[] = {
{ (void*)KERNBASE, 0, EXTMEM, PTE_W}, // I/O space
{ (void*)KERNLINK, V2P(KERNLINK), V2P(data), 0}, // kern text+rodata
{ (void*)data, V2P(data), PHYSTOP, PTE_W}, // kern data+memory
{ (void*)DEVSPACE, DEVSPACE, 0, PTE_W}, // more devices
};
// Set up kernel part of a page table.
pde_t*
setupkvm(void)
{
pde_t *pgdir;
struct kmap *k;
if((pgdir = (pde_t*)kalloc()) == 0)
return 0;
memset(pgdir, 0, PGSIZE);
if (P2V(PHYSTOP) > (void*)DEVSPACE)
panic("PHYSTOP too high");
for(k = kmap; k < &kmap[NELEM(kmap)]; k++)
if(mappages(pgdir, k->virt, k->phys_end - k->phys_start,
(uint)k->phys_start, k->perm) < 0)
return 0;
return pgdir;
}
// Allocate one page table for the machine for the kernel address
// space for scheduler processes.
void
kvmalloc(void)
{
kpgdir = setupkvm();
switchkvm();
}
// Switch h/w page table register to the kernel-only page table,
// for when no process is running.
void
switchkvm(void)
{
lcr3(V2P(kpgdir)); // switch to the kernel page table
}

  kvmalloc调用setupkvm来进行内存页表分配,然后再通过switchkvm函数把新内存页表的首地址写到cr3寄存器上,那么在CPU进行地址翻译的时候就可以查询该内存页表进行地址映射。setupkvm首先用kalloc函数分配一个4k的空闲页作为新的内存页表。xv6采用两级内存页表,最多可以映射4GB的虚拟内存,其中第一级页表就是4k大小。mappages把内核代码段、数据段等内存段的物理地址映射成虚拟地址,并记录在新的内存页表上。mappages这个函数功能就是修改内存页表,构造虚拟内存和物理内存的映射关系。

1
2
3
4
5
6
7
8
9
10
11
12
13
14
15
16
17
18
19
20
21
22
23
24
25
26
27
28
29
30
31
32
33
34
35
36
37
38
39
40
41
42
43
44
45
46
47
48
49
// Return the address of the PTE in page table pgdir
// that corresponds to virtual address va. If alloc!=0,
// create any required page table pages.
static pte_t *
walkpgdir(pde_t *pgdir, const void *va, int alloc)
{
pde_t *pde;
pte_t *pgtab;
pde = &pgdir[PDX(va)];
if(*pde & PTE_P){
pgtab = (pte_t*)P2V(PTE_ADDR(*pde));
} else {
if(!alloc || (pgtab = (pte_t*)kalloc()) == 0)
return 0;
// Make sure all those PTE_P bits are zero.
memset(pgtab, 0, PGSIZE);
// The permissions here are overly generous, but they can
// be further restricted by the permissions in the page table
// entries, if necessary.
*pde = V2P(pgtab) | PTE_P | PTE_W | PTE_U;
}
return &pgtab[PTX(va)];
}
// Create PTEs for virtual addresses starting at va that refer to
// physical addresses starting at pa. va and size might not
// be page-aligned.
static int
mappages(pde_t *pgdir, void *va, uint size, uint pa, int perm)
{
char *a, *last;
pte_t *pte;
a = (char*)PGROUNDDOWN((uint)va);
last = (char*)PGROUNDDOWN(((uint)va) + size - 1);
for(;;){
if((pte = walkpgdir(pgdir, a, 1)) == 0)
return -1;
if(*pte & PTE_P)
panic("remap");
*pte = pa | perm | PTE_P;
if(a == last)
break;
a += PGSIZE;
pa += PGSIZE;
}
return 0;
}

  mappages把需要映射的虚拟内存段分成4k为单位,对于每个4k的内存页,调用walkpgdir查询是否在内存页表里已分配虚拟内存页,如果分配了,则返回PTE;没有分配,则分配该内存页,并返回PTE。得到PTE后,在该PTE中写入对应的物理地址。walkpgdir模拟了CPU的地址翻译功能,把虚拟地址拆分成3部分,用前10个bit找出二级页表,如果二级页表已分配,则返回PTE;如果没有分配,则调用kalloc函数分配二级页表,然后返回PTE。

  这里总结一下xv6分配内存的过程:

  1. 调用kalloc,从内存资源池中取出4KB的空闲内存块。如果本来就不在资源池中的,例如内核代码段、数据段,则可以跳过这一步。但大部分时候是必须的。
  2. 调用mappages函数,把新取出来的空闲内存块映射成虚拟地址。
  3. mappages会调用walkpgdir,根据要映射的虚拟地址,找出二级页表,如果二级页表没有分配,则调用kalloc分配;如果已分配,则在二级页表中找到PTE并返回。

  要注意的是,kalloc分配的内存本来就是虚拟内存,是已经进行过内存映射的,只是映射到高地址的内核区域。由于该虚拟地址是在内核区域中,如果用户进程要使用的话,是访问不了内核区域的地址的,因此仅仅kalloc是不够的,还需要通过mappages进行重复映射,在低地址也映射一次,这实际上是一种内存共享。但像分配二级页表这种动作,只是内核代码内部用到的,就可以直接用kalloc分配的地址了,不需要再次映射。

第一个进程

分配及初始化内核栈

  时至今日,linux系统仍然保留着init进程作为1号进程。在xv6里,init进程正是系统的第一个进程,由内核直接创建的,它是所有进程的祖先。我将通过这个进程的启动与调度过程,来分析xv6的进程调度机制。再看回xv6的main函数,里面的userinit函数创建了这个init进程。userinit函数首先调用了allocproc函数,我们先从allocproc函数开始分析。除了userinit,fork系统调用也用了allocproc函数。xv6创建第一个进程,就是要模拟普通进程的fork动作,其行为和fork调用后派生的进程区别不大。

1
2
3
4
5
6
7
8
9
10
11
12
13
14
15
16
17
18
19
20
21
22
23
24
25
26
27
28
29
30
31
32
33
34
35
36
37
38
39
40
41
42
43
44
45
46
47
48
49
50
51
52
53
54
55
56
57
58
59
60
61
62
63
64
65
// Per-process state
struct proc {
uint sz; // Size of process memory (bytes)
pde_t* pgdir; // Page table
char *kstack; // Bottom of kernel stack for this process
enum procstate state; // Process state
int pid; // Process ID
struct proc *parent; // Parent process
struct trapframe *tf; // Trap frame for current syscall
struct context *context; // swtch() here to run process
void *chan; // If non-zero, sleeping on chan
int killed; // If non-zero, have been killed
struct file *ofile[NOFILE]; // Open files
struct inode *cwd; // Current directory
char name[16]; // Process name (debugging)
};
// Look in the process table for an UNUSED proc.
// If found, change state to EMBRYO and initialize
// state required to run in the kernel.
// Otherwise return 0.
static struct proc*
allocproc(void)
{
struct proc *p;
char *sp;
acquire(&ptable.lock);
for(p = ptable.proc; p < &ptable.proc[NPROC]; p++)
if(p->state == UNUSED)
goto found;
release(&ptable.lock);
return 0;
found:
p->state = EMBRYO;
p->pid = nextpid++;
release(&ptable.lock);
// Allocate kernel stack.
if((p->kstack = kalloc()) == 0){
p->state = UNUSED;
return 0;
}
sp = p->kstack + KSTACKSIZE;
// Leave room for trap frame.
sp -= sizeof *p->tf;
p->tf = (struct trapframe*)sp;
// Set up new context to start executing at forkret,
// which returns to trapret.
sp -= 4;
*(uint*)sp = (uint)trapret;
sp -= sizeof *p->context;
p->context = (struct context*)sp;
memset(p->context, 0, sizeof *p->context);
p->context->eip = (uint)forkret;
return p;
}

  先忽略所有锁相关的代码,本文不打算讨论xv6的并发机制。内核维护了一个进程表,保存所有进程的元信息,这些元信息就是proc结构体的字段。allocproc函数遍历内核维护的进程表,找到没被使用的进程位置,然后标记成used。内核会为该进程分配一个内核栈。操作系统里内核态和用户态的栈是分离的,这样有利于保护内核不被恶意用户程序破坏。用户进程无法直接使用内核栈。allocproc在内核栈中保存了两个结构体,trapframe和context,这两个都是寄存器上下文,是一些寄存器的值。trapframe保存了用户进程使用的所有寄存器的值,context则保存了内核使用的寄存器的值。在进程调度的时候,需要恢复原进程的上下文,这个上下文包括内存页表和寄存器。内存页表在p->pgdir里保存,而寄存器上下文则在p->tr和p->context里保存。它们的具体作用在后面会展开分析。内核栈的视图如下图所示:
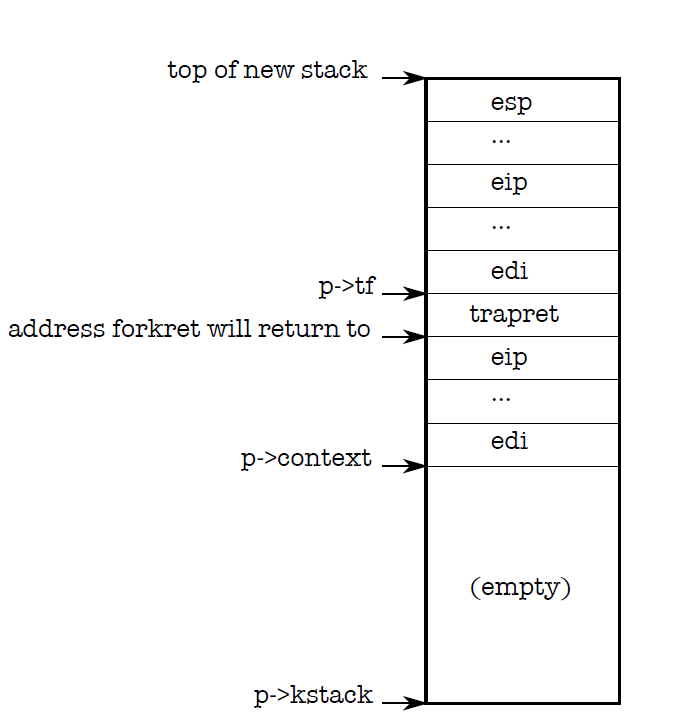
kernel-stack

分配及初始化进程内存页表

  下面看一看userinit的代码:

1
2
3
4
5
6
7
8
9
10
11
12
13
14
15
16
17
18
19
20
21
22
23
24
25
26
27
28
29
30
31
32
33
34
35
36
// Set up first user process.
void
userinit(void)
{
struct proc *p;
extern char _binary_initcode_start[], _binary_initcode_size[];
p = allocproc();
initproc = p;
if((p->pgdir = setupkvm()) == 0)
panic("userinit: out of memory?");
inituvm(p->pgdir, _binary_initcode_start, (int)_binary_initcode_size);
p->sz = PGSIZE;
memset(p->tf, 0, sizeof(*p->tf));
p->tf->cs = (SEG_UCODE << 3) | DPL_USER;
p->tf->ds = (SEG_UDATA << 3) | DPL_USER;
p->tf->es = p->tf->ds;
p->tf->ss = p->tf->ds;
p->tf->eflags = FL_IF;
p->tf->esp = PGSIZE;
p->tf->eip = 0; // beginning of initcode.S
safestrcpy(p->name, "initcode", sizeof(p->name));
p->cwd = namei("/");
// this assignment to p->state lets other cores
// run this process. the acquire forces the above
// writes to be visible, and the lock is also needed
// because the assignment might not be atomic.
acquire(&ptable.lock);
p->state = RUNNABLE;
release(&ptable.lock);
}

  allocproc函数主要是在进程表的slot位置找出可以使用的进程号,然后分配内存给内核栈。userinit还需要用setupkvm来创建新的内存页表。setupkvm会将该虚拟内存的高地址映射到内核所在的物理内存里。每一个用户进程的内存里,都有内核的数据和代码,这样在进入和退出内核态的时候就不需要切换内存页表。在映射了内核的代码和数据后,还需要映射新进程的用户态程序的代码和数据。第一个进程使用init程序,其代码段和数据段被硬编码到内核,首地址便是_binary_initcode_start[]。userinit函数调用inituvm来进行用户进程的地址映射。

1
2
3
4
5
6
7
8
9
10
11
12
13
14
// Load the initcode into address 0 of pgdir.
// sz must be less than a page.
void
inituvm(pde_t *pgdir, char *init, uint sz)
{
char *mem;
if(sz >= PGSIZE)
panic("inituvm: more than a page");
mem = kalloc();
memset(mem, 0, PGSIZE);
mappages(pgdir, 0, PGSIZE, V2P(mem), PTE_W|PTE_U);
memmove(mem, init, sz);
}

  再介绍了mappages和walkpgdir后,理解inituvm就非常容易了,它的逻辑是:

  1. kalloc函数分配4KB的内存。
  2. 将该内存用mappages进行内存映射,映射到虚拟内存的低地址区。
  3. memmove拷贝init的二进制代码段和数据段到用户态内存中。

  userinit剩下的动作就是更新trapframe,其中更新esp字段是让用户栈指针指向用户态内存的最高地址处,然后更新eip字段是让指令寄存器的值指向地址0处。这样在进程调度的时候,通过恢复寄存器上下文,就可以从地址0处开始运行了。最后把进程标记成可调度RUNNABLE。

第一个进程与fork调用的异同

  先给出xv6的fork函数代码。走一遍fork调用的逻辑,就可以发现xv6进程初始化的共性。

1
2
3
4
5
6
7
8
9
10
11
12
13
14
15
16
17
18
19
20
21
22
23
24
25
26
27
28
29
30
31
32
33
34
35
36
37
38
39
40
41
42
43
44
45
46
47
48
49
50
51
52
53
54
55
56
57
58
59
60
61
62
63
64
65
66
67
68
69
70
71
72
73
74
75
76
77
// Create a new process copying p as the parent.
// Sets up stack to return as if from system call.
// Caller must set state of returned proc to RUNNABLE.
int
fork(void)
{
int i, pid;
struct proc *np;
// Allocate process.
if((np = allocproc()) == 0){
return -1;
}
// Copy process state from p.
if((np->pgdir = copyuvm(proc->pgdir, proc->sz)) == 0){
kfree(np->kstack);
np->kstack = 0;
np->state = UNUSED;
return -1;
}
np->sz = proc->sz;
np->parent = proc;
*np->tf = *proc->tf;
// Clear %eax so that fork returns 0 in the child.
np->tf->eax = 0;
for(i = 0; i < NOFILE; i++)
if(proc->ofile[i])
np->ofile[i] = filedup(proc->ofile[i]);
np->cwd = idup(proc->cwd);
safestrcpy(np->name, proc->name, sizeof(proc->name));
pid = np->pid;
acquire(&ptable.lock);
np->state = RUNNABLE;
release(&ptable.lock);
return pid;
}
// Given a parent process's page table, create a copy
// of it for a child.
pde_t*
copyuvm(pde_t *pgdir, uint sz)
{
pde_t *d;
pte_t *pte;
uint pa, i, flags;
char *mem;
if((d = setupkvm()) == 0)
return 0;
for(i = 0; i < sz; i += PGSIZE){
if((pte = walkpgdir(pgdir, (void *) i, 0)) == 0)
panic("copyuvm: pte should exist");
if(!(*pte & PTE_P))
panic("copyuvm: page not present");
pa = PTE_ADDR(*pte);
flags = PTE_FLAGS(*pte);
if((mem = kalloc()) == 0)
goto bad;
memmove(mem, (char*)P2V(pa), PGSIZE);
if(mappages(d, (void*)i, PGSIZE, V2P(mem), flags) < 0)
goto bad;
}
return d;
bad:
freevm(d);
return 0;
}
  1. 调用allocproc函数,如同userinit()里一般,分配及初始化内核栈。
  2. 仍然是分配进程的内存页表,这里调用了copyuvm函数。copyuvm函数开头依然是调用setupkvm函数,先建立内核代码段与数据段在虚拟内存高地址处的映射。但copyuvm不仅仅是新分配一段4KB的内存,然后与新页表建立映射,而是需要把当前进程的页表内容复制一份到新页表里。这就需要把当前进程的用户内存部分,一页一页地拷贝出来,然后再用新拷贝好的内存段与新页表建立映射。
  3. 修改进程表的proc结构体的元信息。主要是更新进程大小以及父进程信息,以及把父进程的tf复制给子进程,这样子进程就继承了父进程的寄存器上下文了。其中eip寄存器存放了当前执行的代码地址,从而子进程在被调度后能接着父进程运行的地方继续运行。
  4. 将tf里的ax置为0,那么新进程被CPU调度后,恢复寄存器上下文的时候,ax寄存器会被置为0,所以子进程的fork函数返回值是0。
  5. 拷贝父进程的文件打开表。

  总结一下xv6里新进程创建的步骤:

  1. 向内存资源池请求4KB,作为内核栈,在栈上分配tf和context的空间。
  2. 向内存资源池请求4KB,作为进程内存页表,并建立对内核数据段和代码段的映射。
  3. 初始化用户空间的内存。在初始化的过程中,会根据用户进程所需内存的大小向内存资源池请求一个或多个4KB内存段,并与内存页表建立映射。对于init进程来说,就是把init程序的代码段和数据段拷贝到用户内存空间里;对于一般的fork出来的子进程,则需要拷贝父进程的内存页表。
  4. 对于fork调用产生的子进程,还需要拷贝父进程tf里的寄存器上下文,并把ax置为0。

进程调度

  初始化了进程的内存空间以后,进程变成可调度状态。我们再回到内核的main函数,main函数里绝大部分动作都是开机的初始化操作。初始化结束后,最后一个mpmain函数就是让内核进入无限循环的进程调度阶段。这个函数里主要是一个核心函数起作用,这个函数叫scheduler。我们来看看scheduler的代码。

1
2
3
4
5
6
7
8
9
10
11
12
13
14
15
16
17
18
19
20
21
22
23
24
25
26
27
28
29
30
31
32
33
34
35
36
37
38
39
40
//PAGEBREAK: 42
// Per-CPU process scheduler.
// Each CPU calls scheduler() after setting itself up.
// Scheduler never returns. It loops, doing:
// - choose a process to run
// - swtch to start running that process
// - eventually that process transfers control
// via swtch back to the scheduler.
void
scheduler(void)
{
struct proc *p;
for(;;){
// Enable interrupts on this processor.
sti();
// Loop over process table looking for process to run.
acquire(&ptable.lock);
for(p = ptable.proc; p < &ptable.proc[NPROC]; p++){
if(p->state != RUNNABLE)
continue;
// Switch to chosen process. It is the process's job
// to release ptable.lock and then reacquire it
// before jumping back to us.
proc = p;
switchuvm(p);
p->state = RUNNING;
swtch(&cpu->scheduler, p->context);
switchkvm();
// Process is done running for now.
// It should have changed its p->state before coming back.
proc = 0;
}
release(&ptable.lock);
}
}

  xv6的进程调度逻辑还是非常简单粗暴,循环遍历进程表,找出可调度的进程,然后调用swithuvm切换内存页表,这个函数主要是把要调度的进程的内存页表的物理地址首地址加载到cr3寄存器里。swtch函数是上下文切换的关键,它会把当前内核的寄存器上下文保存在scheduler的内核栈上,然后切换加载被调度进程内核栈上的寄存器。这个上下文最主要的就是栈指针寄存器esp和程序寄存器eip。下面我们来分析一下swtch代码,这个函数是用汇编实现的。

上下文切换

1
2
3
4
5
6
7
8
9
10
11
12
13
14
15
16
17
18
19
20
21
22
23
24
25
26
27
28
# Context switch
#
# void swtch(struct context **old, struct context *new);
#
# Save current register context in old
# and then load register context from new.
.globl swtch
swtch:
movl 4(%esp), %eax
movl 8(%esp), %edx
# Save old callee-save registers
pushl %ebp
pushl %ebx
pushl %esi
pushl %edi
# Switch stacks
movl %esp, (%eax)
movl %edx, %esp
# Load new callee-save registers
popl %edi
popl %esi
popl %ebx
popl %ebp
ret

  c语言编译器在处理函数调用时候,会把传入参数压入栈内。4(%esp)保存的是**old8(%esp)保存的是*new。而且,c语言编译器在函数调用的时候,遵循着这么一个函数间上下文保存的规则:有些寄存器是调用者函数负责保存的,有些寄存器则是被调用者需要保存的,分别称为caller-save寄存器和callee-save寄存器。caller-save寄存器代表这些寄存器调用者是需要保证在函数返回后保持不变的,这些寄存器往往是调用者自己使用的;callee-save寄存器代表这些寄存器是需要在函数调用过程中保持不变的,这些寄存器往往是被调用者要使用的寄存器。内核在调用swtch函数的时候,caller-save寄存器已经在内核栈上保存了,而swtch只需要保存callee-save寄存器即可。所以我们看到ebp,ebx,esi,edi寄存器作为context被压入栈内。context还需要保存eip,但这个不需要显式地压栈,因为在scheduler函数调用swtch的时候,eip已经作为父函数的下一条指令地址保存在%esp里了,这也是c编译器的规范。

  在保存了寄存器上下文后,就可以切换栈了,p->context是进程调度上下文切换的时候在内核栈上最后保存的数据,所以p->context的地址就是内核栈的地址了。

  切换栈以后,就可以恢复要调度进程的上下文了,将callee-save寄存器弹栈,ret自动将eip弹栈。这样,程序便切换到另一个进程的上下文运行了,sheduler函数暂时被挂起。在进程时间片用完了以后,会再次swtch到sheduler的上下文里,由于用户进程同样映射了内核的代码段和数据段到同样的虚拟地址,所以可以直接访问sheduler函数的代码和数据,因此可以无缝切换到shecduler的上下文,然后scheduler函数会继续运行,第一件事就是switchkvm,把内存页表切换到专门供内核运行的页表。

用户态现场恢复

  在allocproc函数里,我们看到在内核栈里先后分配了trapframe和context的空间,context上节说了是用来做不同进程间上下文切换的,而trapframe则是从内核态回到用户态所要恢复的现场。进程大部分的逻辑应该是在用户态完成的,只有当硬件中断或者发生系统调用时候,才会保存trapframe然后进入内核态。在allocproc函数里,进程调度上下文切换会在forkret中运行,然后forkret返回后就是trapret函数了。我们直接看一下trapret的代码以及trapframe的定义。

1
2
3
4
5
6
7
8
9
.globl trapret
trapret:
popal
popl %gs
popl %fs
popl %es
popl %ds
addl $0x8, %esp # trapno and errcode
iret
1
2
3
4
5
6
7
8
9
10
11
12
13
14
15
16
17
18
19
20
21
22
23
24
25
26
27
28
29
30
31
32
33
34
35
36
37
//PAGEBREAK: 36
// Layout of the trap frame built on the stack by the
// hardware and by trapasm.S, and passed to trap().
struct trapframe {
// registers as pushed by pusha
uint edi;
uint esi;
uint ebp;
uint oesp; // useless & ignored
uint ebx;
uint edx;
uint ecx;
uint eax;
// rest of trap frame
ushort gs;
ushort padding1;
ushort fs;
ushort padding2;
ushort es;
ushort padding3;
ushort ds;
ushort padding4;
uint trapno;
// below here defined by x86 hardware
uint err;
uint eip;
ushort cs;
ushort padding5;
uint eflags;
// below here only when crossing rings, such as from user to kernel
uint esp;
ushort ss;
ushort padding6;
};

  trapret就是把寄存器上下文全部弹栈,iret以后eip指向了原进程用户态的下一条指令的地址。

exec

  在了解了进程调度以后,我们回到init进程。当内核初始化结束后,目前只有init唯一一个进程,它将被调度,然后从eip的地方开始执行。inituvm函数里拷贝的init代码段和数据段,其实只是一个过渡的程序,主要是为了精简短小,不能把真正的代码和数据塞到内核程序里。这段过渡代码主要是发起了exec系统调用,在磁盘里加载真正的init程序。我们来看看exec的逻辑。

1
2
3
4
5
6
7
8
9
10
11
12
13
14
15
16
17
18
19
20
21
22
23
24
25
26
27
28
29
30
31
32
33
34
35
36
37
38
39
40
41
42
43
44
45
46
47
48
49
50
51
52
53
54
55
56
57
58
59
60
61
62
63
64
65
66
67
68
69
70
71
72
73
74
75
76
77
78
79
80
81
82
83
84
85
86
87
88
89
90
91
92
93
94
95
96
97
98
99
100
101
102
103
int
exec(char *path, char **argv)
{
char *s, *last;
int i, off;
uint argc, sz, sp, ustack[3+MAXARG+1];
struct elfhdr elf;
struct inode *ip;
struct proghdr ph;
pde_t *pgdir, *oldpgdir;
begin_op();
if((ip = namei(path)) == 0){
end_op();
return -1;
}
ilock(ip);
pgdir = 0;
// Check ELF header
if(readi(ip, (char*)&elf, 0, sizeof(elf)) != sizeof(elf))
goto bad;
if(elf.magic != ELF_MAGIC)
goto bad;
if((pgdir = setupkvm()) == 0)
goto bad;
// Load program into memory.
sz = 0;
for(i=0, off=elf.phoff; i<elf.phnum; i++, off+=sizeof(ph)){
if(readi(ip, (char*)&ph, off, sizeof(ph)) != sizeof(ph))
goto bad;
if(ph.type != ELF_PROG_LOAD)
continue;
if(ph.memsz < ph.filesz)
goto bad;
if(ph.vaddr + ph.memsz < ph.vaddr)
goto bad;
if((sz = allocuvm(pgdir, sz, ph.vaddr + ph.memsz)) == 0)
goto bad;
if(ph.vaddr % PGSIZE != 0)
goto bad;
if(loaduvm(pgdir, (char*)ph.vaddr, ip, ph.off, ph.filesz) < 0)
goto bad;
}
iunlockput(ip);
end_op();
ip = 0;
// Allocate two pages at the next page boundary.
// Make the first inaccessible. Use the second as the user stack.
sz = PGROUNDUP(sz);
if((sz = allocuvm(pgdir, sz, sz + 2*PGSIZE)) == 0)
goto bad;
clearpteu(pgdir, (char*)(sz - 2*PGSIZE));
sp = sz;
// Push argument strings, prepare rest of stack in ustack.
for(argc = 0; argv[argc]; argc++) {
if(argc >= MAXARG)
goto bad;
sp = (sp - (strlen(argv[argc]) + 1)) & ~3;
if(copyout(pgdir, sp, argv[argc], strlen(argv[argc]) + 1) < 0)
goto bad;
ustack[3+argc] = sp;
}
ustack[3+argc] = 0;
ustack[0] = 0xffffffff; // fake return PC
ustack[1] = argc;
ustack[2] = sp - (argc+1)*4; // argv pointer
sp -= (3+argc+1) * 4;
if(copyout(pgdir, sp, ustack, (3+argc+1)*4) < 0)
goto bad;
// Save program name for debugging.
for(last=s=path; *s; s++)
if(*s == '/')
last = s+1;
safestrcpy(proc->name, last, sizeof(proc->name));
// Commit to the user image.
oldpgdir = proc->pgdir;
proc->pgdir = pgdir;
proc->sz = sz;
proc->tf->eip = elf.entry; // main
proc->tf->esp = sp;
switchuvm(proc);
freevm(oldpgdir);
return 0;
bad:
if(pgdir)
freevm(pgdir);
if(ip){
iunlockput(ip);
end_op();
}
return -1;
}

  在上面的代码中,有不少关于磁盘数据加载的内容,我们先不用深究,只需知道函数的功能就行。exec的第一个传入参数是要加载的应用程序的路径。namei函数是通过路径取出对应文件的inode。由于linux的可执行文件格式是elf格式,所以先用readi通过inode读出文件的elf头部。setupkvm之前提过很多次了,会创建一个内存页表,并建立与内核数据段和代码段的映射,这个页表将成为init进程未来的内存页表。readi(ip, (char*)&ph, off, sizeof(ph)将分段读取程序头部表,根据程序头部表里的待加载程序段的虚拟地址首地址以及程序段总大小,分配内存空间。这一步我们将看看allocuvm函数干了什么。

1
2
3
4
5
6
7
8
9
10
11
12
13
14
15
16
17
18
19
20
21
22
23
24
25
26
27
28
29
30
31
// Allocate page tables and physical memory to grow process from oldsz to
// newsz, which need not be page aligned. Returns new size or 0 on error.
int
allocuvm(pde_t *pgdir, uint oldsz, uint newsz)
{
char *mem;
uint a;
if(newsz >= KERNBASE)
return 0;
if(newsz < oldsz)
return oldsz;
a = PGROUNDUP(oldsz);
for(; a < newsz; a += PGSIZE){
mem = kalloc();
if(mem == 0){
cprintf("allocuvm out of memory\n");
deallocuvm(pgdir, newsz, oldsz);
return 0;
}
memset(mem, 0, PGSIZE);
if(mappages(pgdir, (char*)a, PGSIZE, V2P(mem), PTE_W|PTE_U) < 0){
cprintf("allocuvm out of memory (2)\n");
deallocuvm(pgdir, newsz, oldsz);
kfree(mem);
return 0;
}
}
return newsz;
}

  这个函数会不断增加进程用户空间的内存大小。仍然是以4KB内存段为单位,不断向内存资源池申请空闲内存,然后将该内存与内存页表建立映射。

  在分配完了程序段的内存空间后,就要加载程序段到该内存里了。这一步由loaduvm负责。

1
2
3
4
5
6
7
8
9
10
11
12
13
14
15
16
17
18
19
20
21
22
23
// Load a program segment into pgdir. addr must be page-aligned
// and the pages from addr to addr+sz must already be mapped.
int
loaduvm(pde_t *pgdir, char *addr, struct inode *ip, uint offset, uint sz)
{
uint i, pa, n;
pte_t *pte;
if((uint) addr % PGSIZE != 0)
panic("loaduvm: addr must be page aligned");
for(i = 0; i < sz; i += PGSIZE){
if((pte = walkpgdir(pgdir, addr+i, 0)) == 0)
panic("loaduvm: address should exist");
pa = PTE_ADDR(*pte);
if(sz - i < PGSIZE)
n = sz - i;
else
n = PGSIZE;
if(readi(ip, P2V(pa), offset+i, n) != n)
return -1;
}
return 0;
}

  这个函数也是以4KB内存页为单位,通过内存页表找出对应内存段的物理地址,然后用readi函数把磁盘数据加载到相应的内存里。这里之所以要通过新创建的内存页表去寻找物理地址,是因为当前内存页表并没有映射这些新分配的内存。我们知道,每一个字节的物理内存,除了有可能被映射到某个进程的用户空间以外,肯定也是映射到了内核空间的,也就是每个进程的高地址处。这种内存共享策略非常适合于进行跨页表的内存访问,因为我们可以使用它在内核空间的地址。

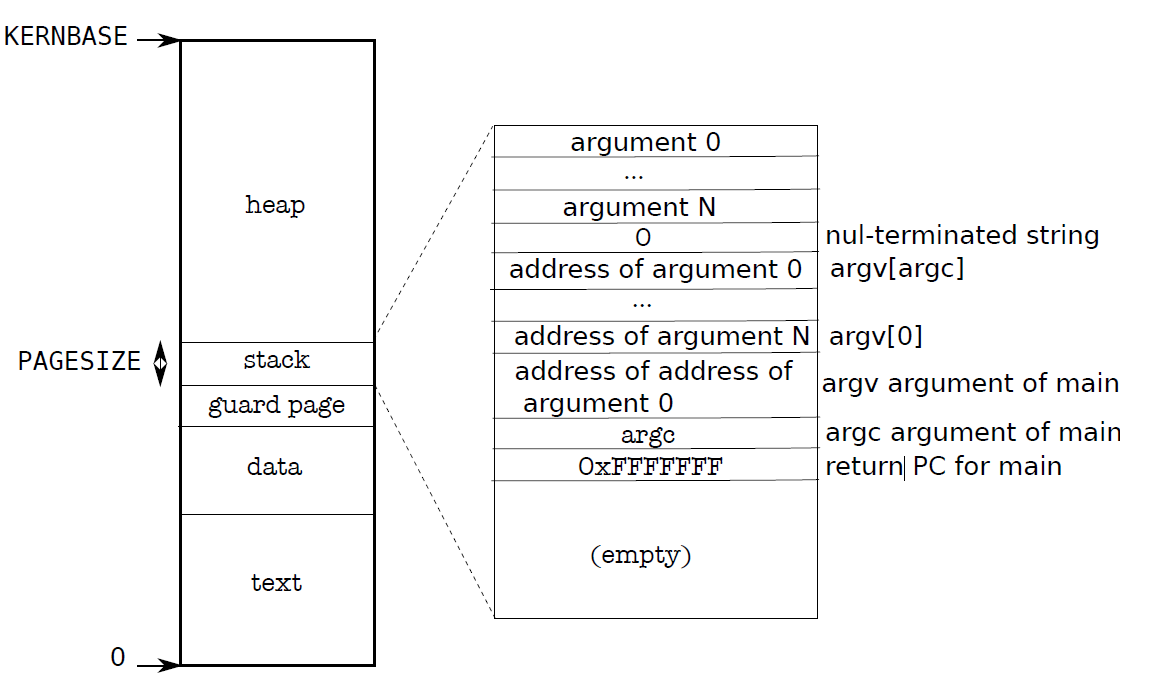
  加载完了代码段、数据段这些程序段以后,还要分配用户栈空间。exec里用allocuvm继续分配两个内存页,其中高地址的内存页作为用户栈,低地址的之后要取消内存映射,作为保护,当发生栈溢出的时候会产生异常中断。

  用户栈的最开头是该程序执行时的传入参数,每一个进程的用户栈布局都会如下图所示:
user-stack

  在创建这个用户栈布局时,主要关注一下copyout这个函数。

1
2
3
4
5
6
7
8
9
10
11
12
13
14
15
16
17
18
19
20
21
22
23
24
25
26
27
28
29
30
31
32
33
34
35
36
37
38
39
40
//PAGEBREAK!
// Map user virtual address to kernel address.
char*
uva2ka(pde_t *pgdir, char *uva)
{
pte_t *pte;
pte = walkpgdir(pgdir, uva, 0);
if((*pte & PTE_P) == 0)
return 0;
if((*pte & PTE_U) == 0)
return 0;
return (char*)P2V(PTE_ADDR(*pte));
}
// Copy len bytes from p to user address va in page table pgdir.
// Most useful when pgdir is not the current page table.
// uva2ka ensures this only works for PTE_U pages.
int
copyout(pde_t *pgdir, uint va, void *p, uint len)
{
char *buf, *pa0;
uint n, va0;
buf = (char*)p;
while(len > 0){
va0 = (uint)PGROUNDDOWN(va);
pa0 = uva2ka(pgdir, (char*)va0);
if(pa0 == 0)
return -1;
n = PGSIZE - (va - va0);
if(n > len)
n = len;
memmove(pa0 + (va - va0), buf, n);
len -= n;
buf += n;
va = va0 + PGSIZE;
}
return 0;
}

  由于当前传入参数的地址是映射到了当前内存页表,要把这些参数拷贝到新内存页表,就需要涉及到跨页表拷贝。可以利用之前提到的跨页表内存访问技术。把目标内存页表的目的地址转化为内核映射的地址,由于当前进程高地址处也映射了同样的内容,所以可以通过这个共有地址进行内存拷贝。

  最后需要进行内存页表切换。先把tf->ip指向init程序的main函数地址,sp指向新分配的用户栈,然后切换内存页表,销毁旧内存页表。由于exec是内核的代码段,在切换内存页表后这部分代码仍然被映射到新内存页表的高地址处,因此可以实现无缝切换。

init进程

  第一个进程终于要正式开始运行了!exec系统调用加载磁盘上的init可执行文件到内存,init进程在被调度返回用户态的时候,就可以运行真正的init程序了。xv6的init进程其实也非常短,有些功能与现代操作系统的init进程是一样的,本文就先按下不表,留待日后讲现代操作系统的进程部分时候再一起总结一下。有关xv6内存管理和进程调度部分,通过跟踪内核main函数的初始化过程,应该也讲得差不多。